Contract Management
OBJECTIVE
The Contract Management option is used to gather information about a given site in order to monitor and invoice planned maintenance based on an agreement with the customer. The contract is the link between service calls and Project Management.
| |
Some tabs and functions may not be available or invisible based on the settings defined by user in the Access Restrictions tab in Security Management.
|
PREREQUISITES
Summary
Steps
| |
maestro* > Service Management > Service Management > Contract > Contract Management
|
Create a contract
- Enter the required information:
| |
Did you know that it is possible, by using a template, to complete certain default values during the creation of a contract? For more information on the subject, consult the Tips & Tricks called Creating template.
|
|
Field
|
Description
|
|
Contract Number
|
Contract number.
NOTE: This field is populated by default when the record is saved if the Contract Number Counter field is completed in Configuration.
It is possible to duplicate a contract. Consult the appendix for the procedure.
|
|
Status
|
Status of the contract. Available values:
|
Active
|
Active contract.
|
|
Closed
|
Contract closed with the Close a Contract option.
|
|
Pending
|
Pending contract. No new transactions can be created for this contract.
NOTE: All visits preceding the contract reactivation date will be considered generated.
|
|
|
Master Contract
|
Identify which master contract the contract is associated to.
At the opening of a new contract, maestro* copies information from the main tab of the master contract to the new contract.
NOTES : It is impossible to enter a service call against a master contract.
It is possible to consult the sub-contracts of a master contract from the Service Contract Inquiry.
|
|
Contract Type
|
By default, displays the type of contract selected in Configuration, but other types of contracts can be selected, such as Total Coverage, Fixed, Maintenance, Residential, Service and Temporary.
NOTE: The contract type allows the user to print the list of contracts or work orders according to the type selected.
|
|
Opening Date
|
Date on which the contract was opened.
NOTE: The current date is entered by default, but it can be changed.
|
|
End Contract
|
Optional date allowing the user to indicate the contract end date.
For example: A contract has a duration of 5 years and the conditions vary from one year to the next. By indicating the end contract date in 5 years, it will be possible to manage the contract one year at a time (Fields Start Date and Ending Date) and to renew the contract each year by applying the changes to the different conditions.
|
- Enter the required information in the
 Contract Description tab:
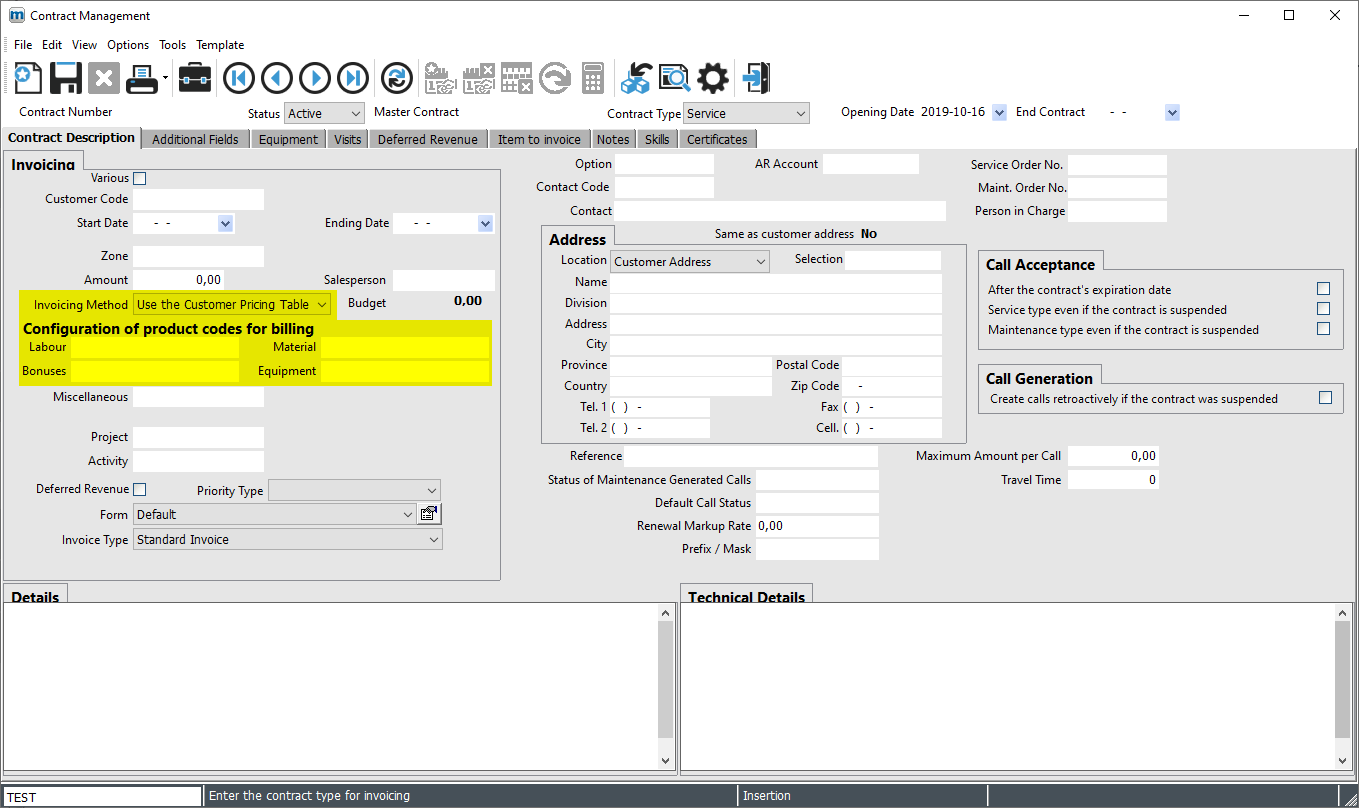
- Invoicing section:
|
|
This section may not be displayed or it may not be possible to modify based on your settings in Security Management, Contract Management section.
|
|
Field
|
Description
|
|
Various
|
Indicates that the contract may be linked to multiple customers, if the box is checked.
NOTE: If the box is checked, the user must identify the customer when entering the call.
|
|
Customer Code
|
Customer to be invoiced from Customer Management.
|
|
Start Date
|
Agreement start date.
NOTE: This field is often used for maintenance contracts.
|
|
Ending Date
|
Agreement end date.
NOTES: This field is often used for maintenance contracts.
If the contract has expired, a new call cannot be entered until the contract has been renewed, except if the configuration described in the next item is enabled.
|
|
Zone
|
Zone for the contract from Define Zones.
NOTE: The field allows the user to conduct by zone in Service Dispatch and Call Dispatch to facilitate the work of the dispatcher.
|
|
Amount
|
Value of the contract.
NOTE: This amount must match the amount entered in the Amount to Invoice and/or Lump Sum columns in the Visits tab. If the amounts do not match, maestro* does not allow the user to save the contract.
|
|
Salesperson
|
Salesperson from Salesperson Management.
|
|
Invoicing Method
|
Indicates to maestro* the invoicing method to use to calculate the selling rate when in the Preparation step. Available values:
|
Activity
|
Calculates the hour selling rate depending on the defined activity in the Return From a Service Call or Distribute Hours.
|
|
Category
|
Calculates the hour selling rate depending on the defined category in the Return From a Service Call or Distribute Hours.
|
|
Use the Customer Pricing Table
|
Calculates the hour selling rate, the equipment and the material according to the table customer pricing table.
With this invoicing method, the user must determine the variables to use to create billing codes for each of the four types of expenses (Labour, Bonus, Material and Equipment).
The variables necessary to create the formulas and their meaning are available in the appendix.
NOTE : If an invoicing method has been selected in the Customer Management, the latter will be proposed by default when creating a new contract. It is possible to change this value in the contract.
|
|
|
Budget
|
Total value of the budget allocated for labour and equipment, according to would have been entered in the Equipment Budget and Labour Budget columns in the Visits tab.
|
|
Invoicing Table
|
Table containing the hourly selling rate used for the contract.
NOTES: The hourly rate tables are from the Invoicing Rate Table.
If an activity Invoicing table has been chosen in Customer Management, it will be selected by default when a new contract is created. The user can change this setting for the contract.
|
|
Markup Table
|
Markup rate table used for the sale of parts in this contract.
NOTES: The equipment mark-up table must be created in the Invoicing Rate Table option.
If a mark-up rate table has been chosen in Customer Management, it will be selected by default when a new contract is created. The user can change this setting for the contract.
|
|
Equipment Table
|
Equipment invoicing table used for this contract.
NOTES: The equipment table must be created in the Invoicing Rate Table option.
If no equipment table is defined, the user must enter the selling prices for the equipment manually, if applicable, when preparing the invoice.
|
|
Miscellaneous Charges
|
Invoicing table used for applicable miscellaneous charges for this contract. This table is used when the invoice is prepared.
NOTES: The miscellaneous charges table must be created in the Invoicing Rate Table option.
If a miscellaneous charges table has been selected in Customer Management, it will be selected by default when a new contract is created. The user can change this setting for the contract.
|
|
Project
|
Project to which the costs and revenue will be transferred.
|
|
Activity
|
Activity used to post the costs and revenue.
NOTE: The general ledger account used for the revenue depends on the reading priority to determine the selling in Invoicing.
|
|
Deferred Revenue
|
Tells maestro* that the contract uses the functions linked to invoices collected and paid in advance, if the box is checked.
NOTES: As a result, processing of the sale does not affect the default sales accounts. Instead it affects different accounts based on the configuration of amounts collected in advance.
The field is only displayed if the Deferrals module is installed.
|
|
Priority Type
|
Processing priority from Define Priority Types.
NOTE: The priority is displayed by default when a call is entered.
|
|
Form
|
Work order template used for this contract.
NOTE: If the field is at Default, maestro* uses the template by default entered in Configuration.
|
|
Invoice Type
|
Type of invoicing used for this contract. Available values:
|
Standard Invoice
|
Invoices each call separately.
|
|
Combine Posted Invoices
|
Groups multiple invoices for the same contract with various accounts receivable and prints a summary for all of the invoices, grouping the various invoices onto a single invoice.
|
|
Consolidate Invoices before Posting
|
Used to prepare multiple invoices and the sale is posted during combined invoicing. Consequently, there is only one account receivable rather than several.
|
|
|
Quotation Form Type
|
Indicates the type of form that will be generated for service quotations for this contract. Three types are available:
- Customer Detailed;
- Customer Summarized (default);
- Internal Use Form.
NOTE: This field only appears if the Service Quotation option available with maestro* 3.05 MS SQL is installed.
|
|
|
The fields listed below are linked to the Contract Description. This section may not be displayed or it may not be possible to modify the fields based on the user’s settings in Security Management.
|
|
Field
|
Description
|
|
Option
|
Information in a maximum of 10 alphanumeric characters that can be printed on forms are used for information purposes.
|
|
AR Account
|
Account receivable assigned for this contract, if other than the standard account receivable.
NOTE: By specifying an account receivable here, maestro* uses this account by default rather than the one specified in Configuration.
|
|
Contact Code
|
Used to select a contact from Contact Management. This contact serves as a resource person for the whole of the contract.
|
|
Contact
|
Allows the user to enter the contact name for the contract, if the Contact Management is not used.
NOTES: If this field is completed when entering a call, the contact’s name is displayed automatically.
The name of the contact is not editable when it comes from the Contact Management.
|
|
Service Order No.
|
Customer's purchase order number for this contract that will be used by default for all service or installation calls.
NOTE: When a call is entered, the user can change this purchase order number.
|
|
Maint. Order No.
|
Customer's purchase order number for this contract that will be used by default for all calls related to maintaining this contract.
NOTES: When a call is entered, the user can change this purchase order number.
Maestro* displays this number when generating maintenance calls. If an order number is not specified, the term CONTRACT is displayed.
|
|
Person in Charge
|
Code of the employee responsible for the contract.
NOTES: The person in charge is from Employee Management. Only employees belonging to an employment category that is linked to the Service Management module are displayed in the list.
The person in charge is often the technician assigned to the contract. When the call is opened, maestro* proposes this name by default.
|
|
Reference
|
Used to enter text for information purposes only.
|
|
Travel Time
|
Used to enter the travel time needed to arrive on site at the contract location.
NOTES: The travel time may be added to the duration of the call in the option Call Dispatch (an icon representing a truck is displayed), if the dispatch model is configured to manage the travel time (in the Dispatch Model Management option, Other tab).
In the case where the travel time management is enabled, the user can import the hours and the travel time with the Automatic insertion according to the dispatch icon (during the Return From a Service Call).
|
|
Status of Maintenance Generated Calls
|
Allows the user to define the default call status for maintenance-generated calls with the Generate Maintenance Calls option for this contract.
|
|
Default Call Status
|
Used to define a default call status for new calls created. This status will help the dispatcher put an indicator to each call according to its progress (for example To Assign, In Progress, On the Road, etc.).
|
|
Maximum Amount per Call
|
Allows the user to indicate a default maximum amount per call.
|
|
Company ID Mask
|
Lets the user link the contract to one company only or to a subset of companies (if the filter entered contains Xs). The contract is therefore not accessible in the other companies.
NOTES: Available in multidimensional mode only.
Maestro* validates the company identification filter to avoid leaving it blank or entering a filter with X if the field Link service contracts to a specific company is checked in Configuration.
|
- The Address section displays all the fields needed to identify where the work is taking place:
|
Field
|
Description
|
|
Location
|
Location of work for the contract. Available values:
|
Customer
|
Used to select the customer address identified in Customer Management.
NOTES: It is possible to syncronize this section with all changes made to the address in Customer Management by activating the Copy the customer’s address field in Configuration.
It is possible to select another address for the same customer, by selecting an address issued from Define Customer Addresses.
|
|
Contract Address
|
Used to manually enter the address for the contract.
NOTE: The address cannot be reused in another contract seen as the information is used uniquely for the current contract.
|
|
Alternate
|
Used to manually enter an alternate address or to select an already existing alternate address.
NOTE: To enter a new alternate address, simply click on the three dots (…) of the Selection field and enter the address information. The alternate addresses are from Alternate Addresses Management.
|
|
Contact
|
Used to select an address associate to an issued contract from Contract Management.
NOTE: Only contacts of the Site type linked to the customer will be available.
|
|
|
Selection
|
Allows the user to access the required database depSending on the selection made in the Location field.
|
- Call Acceptance/Quotation section:
|
Field
|
Description
|
|
After the contract's expiration date
|
If this box is checked, users will be able to enter service type calls for an expired maintenance contract.
This scenario is used in situations where the same contract is used to enter maintenance and service calls.
NOTE: It will be impossible to enter calls for a contract which has not been renewed if the box is left unchecked.
|
|
Service type even if the contract is suspended
|
If this box is checked, Service type calls will be accepted, even if the contract has been suspended.
|
|
Maintenance type even if the contract is suspended
|
If this box is checked, Maintenance type calls will be accepted, even if the contract has been suspended.
|
- Call Generation section:
|
Field
|
Description
|
|
Create calls retroactively if the contract was suspended
|
If this box is checked, it will be possible to generate planned visit calls which were never performed during a contract's suspension period.
NOTE: maestro* will only take this parameter into account when a user uses the Generate Maintenance Calls option.
|
- Contract Renewal section:
|
Field
|
Description
|
|
Automatic Renewal
|
If this box is checked, the contract will be identified as authorized to be renewed automatically in the Batch Renewal option. We will therefore be able to apply a filter to facilitate the search for these contracts.
|
|
Order Number Required
|
If this box is checked, the contract will be indentified as required to have an order number in the Batch Renewal option. We will therefore be able to apply a filter to facilitate the search for these contracts.
|
|
Apply the Renewal Markup Rate on Items to Bill
|
Available values:
|
According to the General Setting
|
If this option is selected, the system will refer to the to determine if the markup rate should be applied to items to bill.
|
|
No
|
If this option is chosen, the markup rate will not be applied to the items to bill, in every case.
|
|
Yes
|
If this option is chosen, the markup rate will be applied to the items to bill, in every case.
|
|
|
Renewal Markup Rate
|
Markup percentage to be used to renew the contract.
NOTE: The markup rate can be from 0 to 999.99%. If the user enters a value of 10, the amounts will be marked up by 10%.
|
- Details section: This section is for entering administrative information about the contract. This information can be viewed in Enter a Service Call, Service Contract Inquiry, Return From a Service Call and invoice Preparation windows.
- Technical Details section: This section is used for entering information used by the technician when carrying out the work for this contract. This information can be printed on the technician’s work order and is accessible in Enter a Service Call and Service Contract Inquiry.
- Enter the required information in the Equipment tab:
|
We recommend completing the Visits tab before this section to avoid having to return.
|
|
Field
|
Description
|
|
Print type of equipment
|
Tells maestro* how the equipment will be printed on the technician’s work order.
- If task and maintenance management is not used, print Several EQ units per page must be selected.
- If the work orders must be printed with a list of tasks and maintenance activities, print Several EQ units per detailed page must be used.
- Print 1 EQ unit per page tells maestro* to insert a page break between each piece of equipment in the contract.
- Print X pieces of equipment per pageis used to print the number of pieces entered in the Pieces of equipment per page field. This field is only available in this configuration.
|
|
Active Equipment Only
|
If this box is checked, only the equipment meeting the following criteria will be displayed:
- There is no Effective Date OR there is an Effective Date, but it is prior or exactly the work date, AND;
- There is no Inactivity Start Date OR there is an Inactivity Start Date, but it is later than the work date.
Validated in relation to the work date.
|
|
Documents
|
Available values:
|
Related to this Contract
|
Used to link relevant documents to the contract (such as the site plan, photos of equipment, etc.).
|
|
Related to this Equipment
|
Displays the documents added from Document Management using the Equipment Management option (for example, the technical data sheet for the equipment).
|
|
Related to this line
|
Used to link different documents for a line to another, even if it is the same equipment, to the equipment present in the grid.
|
|
|
Equipment details
|
Available values:
|
Number
|
Used to identify the pieces of equipment for the contract.
NOTE: Usually, the number is 1 when serial numbers are generated.
|
|
Equipment
|
Used to enter the equipment covered by the contract.
NOTE: The equipment code must be created in advance in Equipment Management.
|
|
Description
|
Displays the description for the selected equipment.
NOTE: This field cannot be modified because the information is taken from Equipment Management.
|
|
Brand
|
Displays the brand of the selected equipment.
NOTE: This field cannot be modified because the information is taken from Equipment Management.
|
|
Model
|
Used to enter the equipment model.
NOTE: The content of this field can be printed on the maintenance work order form if the form is configured as such.
|
|
Unit Type
|
Used to enter the unit type related to the equipment.
NOTE: The content of this field can be printed on the maintenance work order form if the form is configured as such.
|
|
Location
|
Used to enter the location of the equipment at the customer’s premises.
NOTE: The contents of this field can be printed on the maintenance work order from if configured this way.
|
|
Serial number
|
Used to enter the serial number of the equipment.
NOTE: The contents of this field can be printed on the maintenance work order from if configured this way.
|
|
Order No.
|
Used to enter or select the purchase order that was applied to the equipment acquisition.
NOTE: It is possible to view the details of the order by clicking on the Order Inquiry icon. The icon is available in the menu bar only if the user has access to the Order Inquiry.
|
|
Extension
|
Used to enter the purchase order extension that was applied to the equipment acquisition, if that’s the case.
|
|
Customer’s Ref. No.
|
Used to enter the equipment reference number at the customer’s premises.
NOTE: The contents of this field can be printed on the maintenance work order from if configured this way.
|
|
Sector Served
|
Used to enter the sector served by equipment at the customer's premises.
NOTE: The contents of this field can be printed on the maintenance work order form is configured as such.
|
|
Effective Date
|
Used to enter the date from which the equipment will be in service.
|
|
Inactivity Start Date
|
Used to enter the date from which the equipment will no longer be in service.
|
|
|
Warranty
|
Warranty on the equipment. Available values:
NOTE: When entering a call or return from call, maestro* warns the user that the equipment in the contract is under warranty.
|
Start Date
|
Warranty start date after purchase or when the equipment is replaced.
|
|
End Date Labour
|
Warranty end date on labour for each piece of equipment covered in the contract.
|
|
Equipment Date Material
|
Warranty end date on parts for each piece of equipment covered in the contract.
|
|
|
Visits
|
Allows to indicate what kind of maintenance work is scheduled for an equipment during a specific visit. The maintenance works available for the equipment must be configured in the Define Maintenance Items option.
NOTE: A column is displayed for each visit created in the Visits tab, identified using its date.
|
- Enter the required information in the Visits tab:
Add a Maintenance Call
It is possible to enter a maximum of 100 visit lines in the grid. Each added visit becomes a Visit column (identified using the visit date) in the Equipment tab, which allows to indicate the maintenance to be done.
|
Field
|
Description
|
|
Date
|
Schedule of dates for contract visits.
NOTES: The date entered is the date of the visit (call) and invoicing if the Amount to Invoice column is completed.
The status of a visit date may have been set to Generated if it was suspended during a contract suspension period. It cannot be invoiced or generated after the contract is reactivated.
|
|
Type of Visit
|
Tells maestro* which type of visit is required when generating calls. Maestro* creates a call for the technician.
If no visit type is entered, maestro* will invoice the amount only. In this case, the Date and Amount to Invoice fields must be completed.
|
|
Visit Type Desc.
|
Description of the visit type selected in the Type of Visit column.
|
|
Required Date Calculation
|
Displays, based on the type of visit selected, how the work required date will be applied.
This calculation of the required date will allow dispatchers to know if the visit date is fixed, approximate or limit.
A fixed date represents a date for which the maintenance is to be performed and it is impossible to move.
An approximate date is a date for which we would like to perform the maintenance, but the dispatcher can decide to move it ahead or to delay the visit.
A limited date is the latest date for which the technician visit is to be performed. In some cases, the dispatcher may decide to move the visit ahead, without impacting the maintenance.
|
|
Total Time
|
Planned duration for the maintenance activity.
NOTE: By completing this field, the user can estimate the number of hours of labour required for the maintenance contracts by printing the Labour Forecast report.
For a visit, even if the service call has been generated, the value of this column can be modified.
|
|
Amount to Invoice
|
Tells maestro* to create an invoice automatically when generating calls, without the technician performing the work.
NOTE: Maestro* creates a pending invoice in the Invoicing option using the 7-Invoicing transaction type.
For a visit, even if the service call has been generated, the value of this column can be modified.
|
|
Work Description
|
Description of the work to be performed during this visit.
NOTES: The content of this field can be printed on the maintenance work order form if configured this way.
To enter a note, double-click in the field to display the text window. Entered notes are saved until they are removed by a user.
|
|
Technical Details
|
Notes used by the technician during his visit.
NOTES: The content of this field can be printed on the maintenance work order from if configured this way.
To enter a note, double-click in the field to display the text window. Entered notes are saved until they are removed by a user.
|
|
Material Budget
|
Monetary budget for equipment expenses for this visit.
NOTE: Actual costs can be compared to the budget in Service Contract Inquiry.
|
|
Labour Budget
|
Monetary budget for service employees’ salaries involved in this visit.
NOTE: Actual costs can be compared to the budget in Service Contract Inquiry.
|
|
Lump Sum
|
Lump sum amount for the visit.
NOTE: If an amount is entered in this field, maestro* does not create an invoice automatically. However, when calls are generated, maestro* enters the lump sum amount entered here in the call. Once the call procedure is completed, (call assignment, return from call, preparation and invoicing), this amount can be invoiced.
For a visit, even if the service call has been generated, the value of this column can be modified.
|
|
Special Material
|
Used to specify that the equipment used for a specific visit is different from the equipment entered in Equipment Management.
NOTES: The icon can be used to make modifications to the equipment for a visit.
Click on the Lock icon to make changes. The icon changes to an open lock and the user can then make changes to the equipment on the right for each piece of equipment required for the visit. When the modifications have been made, click the Save icon. Clicking the Set as default icon returns the default equipment.
It is possible to modify the special material of a Closed call, but it is not possible to modify the special material of a call when a dispatch is ongoing - a message to this effect appears when a user tries to modify the special material of a call with an ongoing dispatch.
|
|
Form
|
Work order template used for this visit.
NOTE: If the field is set to the Default setting, maestro* uses the template entered in the contract. If the contract form is also set to the Default setting, maestro* uses the template specified in Configuration.
|
|
Skill
|
Used to determine the technician’s required competence to perform the visit.
NOTES: This column is visible only if the user has access to the Skills section, defined in the Access Restrictions tab (Service Calls section) of the Security Management option.
If a skill is linked to an activity, it will be automatically proposed by default. Otherwise, it can be entered manually.
If the Skills tab has been previoulsy completed, the technician will be displayed by default depending on the selected skill.
|
|
Technician
|
Identifies the technician to be assigned to the visit.
This technician will be identified in the call. The dispatcher can then confirm the technician during Call Dispatch or Service Dispatch. If this field is empty, the technician displayed in the call will be assigned to the contract.
NOTES: The technician may be displayed by default, if the latter has been previously identified in the Skills tab.
If a technician is entered manually, maestro* ensures that the technician has the skill identified in the Employee Management, under one of the icons below:
- Human Resources File, if the Human Resources module is installed; OR
- Define Skills
|
|
Generated Call
|
Displays the call number created via the Generate Maintenance Calls option.
|
|
Generated Requisition
|
Displays the generated requisition number for each call, if applicable.
NOTE: See parameter Creation of requisitions for the required material, in the Service Management Configurations, General section.
|
|
Entered Call
|
Displays the call number created manually with the Enter a Service Call option.
NOTES: To ensure the link between the visit and an entered call is established, the Call Type must be Maintenance and the job date for the work must be the same as the visit date.
If multiple calls have been entered manually and match the criteria in the previous note, maestro* only displays the last saved call.
|
|
Note
|
Maestro* displays a note if a visit could not be generated after reactivating a contract. This occurs if visits were scheduled between the time the contract was suspended and when it was reactivated.
NOTE: You can change the amount of visits not generated to balance the contract amount with the visits.
|
Cancel a maintenance call
The user can cancel a generated maintenance call by clicking the Delete the Generated Call for Current Visit icon.
To cancel a generated maintenance call, the following conditions must be met:
- The status of the call must be Entered.
- In Configuration,in the Dispatch tab of the Service Management module, the No Service Call Allocation box must not be checked. Otherwise, the status of generated calls will be Completed rather than Entered.
- The generated call should not have an amount to be invoiced.
- No transaction (service dispatch or call dispatch, return from a service call, preparation, invoicing or combined invoicing) can be linked to the call number.
If the conditions listed above are met, when selecting the visit line, the Delete the Generated Call for Current visit icon will be available. When clicking the icon, maestro* deletes the generated call and makes the visit available again so that changes can be made.
Contract Renewal
Following a contract renewal, every value of a table’s lines can be modified, including those linked to calls generated before the contract was actually renewed.
Budgets for unrenewed projects cannot be modified if calls were generated in relation to the source visit, and if these calls are present in the Generated Call or Entered Call columns.
- Enter the required information in the Other tab:
|
Field
|
Description
|
|
Mobility section
|
|
Send Multi-Visit Call Form
|
Allows to send the multi-visit form when reaching the end of a service call linked to this contract.
NOTE: When a new contract is created, this box will be automatically checked if the configuration of the same name is checked in the service call configurations (General section, Mobile sub-section).
|
|
Service Quotation service
|
|
Customer Form
|
Allows the selection of a default customer form for service quotations.
|
|
Billing Mode for Generated Calls
|
Available values:
|
According to the General Setting
|
If this value is selected, the system will refer to the value selected in the Billing mode for Calls field of the service management Configurations.
|
|
Lump Sum
|
The quotation total amount will be saved in the Lump Sum field.
|
|
Time and Material
|
In this situation, the system will not save the total amount in the generated call. However, if the quotation is Fixed, even if set to Time and Material, the tatal amount of the quotation will be saved in the Lump Sum field of the service call.
|
|
- Enter the required information in the Deferred Revenue tab:
|
The Deferred Revenue New Invoice icon is used to renew the contract in advance, even if the advance collection for the preceding year has not been completed.
The Delete this Deferred Revenue Invoice icon is used to delete an invoice for income collected in advance for which there have been no transfers.
|
|
Field
|
Description
|
|
Code
|
Code assigned automatically on saving to identify the transaction for income collected in advance.
|
|
Start Date
|
Used to tell maestro* from which date it should start distributing income collected in advance.
NOTE: By default, the date entered is the date of the first visit under the contract.
|
|
Description
|
Description that identifies the advance collection.
|
|
Category
|
Income category from Categories of Inv. Coll/Paid in Advance.
|
|
Invoice#
|
The invoice number associated with the transaction.
NOTE: This number is entered by the user and is displayed for information purposes only. It can be entered from either Contract Management or Invoices Collected/Paid in Advance.
|
|
No. of Payments
|
Number of payments to be made.
NOTE: The number of payments is determined based on the information entered in Configuration.
|
|
Frequency
|
By default, displays the frequency used for transferring advance collections.
NOTE: It can be modified.
|
|
Calculation
|
Used to select how the calculation is performed.
The choices are: Amount, Quantity and Rate.
|
|
Total Qty
|
Displays the total quantity if the Calculation field is set to Quantity.
|
|
Amount
|
Total amount of the contract.
|
|
Balance
|
Balance of advance collections to be transferred.
|
- Allocation section:
|
Field
|
Description
|
|
Allocation
|
Project allocated when advance collections are transferred.
|
|
Revenue / Expense
|
Available values:
|
Project
|
Project to which income is posted when transferring advance collections.
NOTE: This project is identified in the Contract Description tab.
|
|
Activity
|
Activity to which income is posted when transferring advance collections.
NOTE: This project is identified in the Contract Description tab.
|
|
Group
|
Group to which income is posted when transferring advance collections.
|
|
|
Distribution calculated
|
Used to identify the project, activity or group affected on invoicing deferred contracts as long as advance collections have not been transferred. Available values:
|
Project
|
By default, displays the project configured in Configuration (icon), Deferred Revenue tab.
|
|
Activity
|
By default, displays the activity configured in Configuration (icon), Deferred Revenue tab.
|
|
Group
|
By default, displays the group configured in Configuration (icon), Deferred Revenue tab.
|
|
- Distribution section:
|
To complete the distribution, simply click the Prepare Distribution icon to have the distribution grid completed automatically.
|
|
Field
|
Description
|
|
Date
|
Dates on which advance collections are distributed according to the configuration. This can be on the visit dates or based on 12 payments.
|
|
Active
|
The distribution is completed on the date planned if the box is checked.
|
|
Quantity
|
Quantity to be distributed, if the calculation method is set to Quantity.
|
|
Amount
|
Amount to be distributed by date.
|
|
Rate
|
Rate to be distributed if the calculation method is set to Rate.
|
|
Amount to Invoice
|
Amount to be invoiced in the Visits tab.
|
|
Actual
|
Actual amount of advance collections transferred.
|
|
Trans No. transferred
|
Transaction number of the project-to-project transfer when the transfer to accounting is completed.
|
|
Account Project
|
Transaction number generated by the transfer of advance collections in a project-to-project transfer transaction.
|
|
Transfer Date
|
Date on which the advance collection was transferred.
|
- Enter the required information in the Item to invoice tab:
|
This section is used to enter expenses without costs and for which fixed amounts in the contract must be invoiced.
|
|
Field
|
Description
|
|
Code
|
Used to select an item from Catalogue Management (inventory) or Define Materials.
|
|
Description
|
Description of the item selected in the Code column.
|
|
U.P.
|
Unit selling price for the item to be invoiced.
|
|
Tax 1 & Tax 2
|
Applicable tax codes.
NOTES: If a formula to use tax codes has been configured in the Define Tax Code Usage option for the Service Call Invoicing transaction type, the tax columns will not be visible because the taxes will be determined by parameters that will be known at the time of invoicing.
To determine the source of the tax code and applicable tax rates, refer to help on Reading Tax Codes in maestro*.
|
|
Amount to Invoice
|
Amount to be invoiced.
NOTE: The amount is displayed by default if the Quantity and Unit Price columns have been completed. Otherwise, you can enter an amount to be invoiced manually.
|
|
Revenue Type
|
Used to select the type of income to assign to this item.
|
|
Applicable to Calls
|
Used to specify the call type(s) to which the Items to invoice apply.
The drop-down menu options are:
- All
- Service
- Installation
- Maintenance
|
|
Applicable to Lump Sum Calls
|
Allows to indicate that an item to invoice applies to lump sum calls. When a product code is added or modified on a line of the grid, the box is checked by default.
|
- Enter the required information in the Notes tab: The notes entered in this section are displayed automatically when selecting a service contract in the following windows: Enter a Service Call, Return From a Service Call and Service Contract Inquiry, if this function has been configured in the option Preferences.
- Enter the required information in the Skills tab: By default, this tab displays all the skills entered in the Define Skills option. It allows the user to enter, for each of the contracts, technicians by default for each of the skills. Thus, when entering a call, if a skill is required to perform the work, maestro* will suggest, by default, the technician with this skill depending on the contract.
- Enter the required information in the Certificates tab: This tab allows the user to enter, for informational purposes, the certifications required for the contract. The certifications are obtained from the Define Supplier Certificates option available under the Maintenance section in the Purchasing menu.
By indicating a certification for the contract, maestro* validates, during the call dispatch, that the technician has the required certification to perform the work.
- The Modifications tab displays the history of all modifications made to a contract. We can therefore know which field has been modified, its original value, the new value, the user who made the change, and the time and date of the modification.
- Click Save.
See also
APPENDIX
Invoicing Method "Use the Customer Pricing Table"
This invoicing method allows the user to use a price list entered in the Customer Discounts Table used in the quotations modules and the control board to determine the selling prices applicable to materials, to labour, to the bonuses and the equipment. These selling amounts will be applied during the Preparation of the invoice.
Each transaction linked to the service call should be represented with a product code in the Catalogue Management in relation to the variables used in the Configuration of product codes for billing section of the Contract Management.
|
If the invoicing method is Use the Customer Pricing Table, and no configuration is present in the Contract Management, maestro* uses the configuration of the product codes determined in the Configuration option in the Service Management module.
|
|
Before using this feature, we recommend that you make an appointment with the professional services team in order to obtain the necessary training to use it and understand all its aspects.
|
Section "Configuration of product codes for billing"
This section is visible only when Use the Customer Pricing Table invoicing method is selected. It allows the user to determine the formulas to use to generate catalogue item codes which will be used to invoice the expense transactions charged to a call. These codes are generated from the data presented in the transactions. These formulas can include different variables depending on the type of expense to be invoiced. For example, WORKCATEG-TRADECODE would be used to build an item code composed of the employee’s employment category and profession for Labour type transactions.
|
In the formulas, it is possible:
- To combine several variables by using the dash as a separator between the variables;
- To enter constants (prefixes and/or suffixes). For example, the formula representing labour could be A-WORKCATEG having as a result in the Catalogue Management, an item code A-220 for employment category 220;
- Enter N/A to never invoice an expense type. This expense will be ignored during the processing of the preparation.
|
Labour and Bonus
|
Field
|
Description
|
|
Labour
|
Formula used for the construction of the labour code used in the chargeback of costs related to labour.
|
|
Bonus
|
Formula used for the construction of the bonus code used in the chargeback of costs related to a bonus.
|
|
Variable
|
Detail
|
|
ACTIVITY
|
Expense activity defined in Contract Management. If this activity is empty, maestro* uses the one from the call.
|
|
ACTIVITYDESC
|
Description of the expense activity defined in Contract Management. If this activity is empty, maestro* uses the one from the call.
|
|
ACTIVITYSC
|
Expense activity entered from the options Return From a Service Call or Distribute Hours.
NOTE: This description is from Define Activities in the Service Management module and not from the Project Management.
|
|
ACTIVITYDESCSC
|
Description of the expense activity defined in the options Return From a Service Call or Distribute Hours.
NOTE: This description is from Define Activities in the Service Management module and not from the Project Management.
|
|
GROUP
|
Expense group linked to the hours or to a bonus, entered in the options Return From a Service Call or Distribute Hours.
|
|
EMPLOYEENO
|
Employee number.
|
|
WORKCATEG
|
Employee employment category associated with the employee record in the Time Management module.
NOTE: Maestro* uses the employee employment category present at the time of invoicing and not the one at the time of the transaction entry.
|
|
NOCATAS
|
Service call employee employment category associated with the Employee management in the Service Management module.
NOTE: Maestro* uses the employee employment category present at the time of invoicing and not the one at the time of the transaction entry.
|
|
OCCUPATIONTYPE
|
Employment type.
NOTE: Maestro* uses the employee employment type present at the time of invoicing and not the one at the time of the transaction entry.
|
|
TRADECODE
|
Employee’s trade.
|
|
RATETYPE
|
Letter corresponding to the type of rate.
A for the regular rate.
B for the time and a half rate.
C for the double time rate.
P for the bonus rate.
|
|
BONUS CODE
|
Bonus code.
|
|
SECTOR
|
CCQ sector associated with the project identified in Contract Management. If the project is empty, maestro* uses the CCQ sector associated to the call’s project.
|
|
ANNEX
|
CCQ annex associated to the project identified in Contract Management. If the project is empty, maestro* uses the CCQ annex associated to the call’s project.
|
|
LEVEL
|
Year of training of the employee based on the trade.
|
|
REGION
|
Region associated to the project identified in Contract Management. If the project is empty, maestro* uses the region associated to the call’s project.
|
|
SHIFT
|
Work shift specified in Return From a Service Call or in Distribute Hours.
|
Material
|
Field
|
Description
|
|
Material
|
Formula used for the construction of the material code used in the chargeback of costs related to materials.
|
|
Variable
|
Detail
|
|
ACTIVITY
|
Expense activity defined in Contract Management. If the activity is empty, maestro* uses the one from the call.
|
|
ACTIVITYDESC
|
Description of the expense activity defined in Contract Management. If the activity is empty, maestro* uses the one from the call.
|
|
GROUP
|
Expense group linked to material entered in the Return From a Service Call or in Distribute Hours.
|
|
PRODUCTCODE
|
Material code entered in the Return From a Service Call or in Purchasing.
|
Equipment
|
Field
|
Description
|
|
Equipment
|
Formula used for the construction of the equipment code in the chargeback of costs related to equipment.
|
The variables below apply to equipment hours entered from the Return From a Service Call option only.
|
Variable
|
Detail
|
|
ACTIVITY
|
Expense activity defined in Contract Management. If the activity is empty, maestro* uses the one from the call.
|
|
ACTIVITYDESC
|
Description of the expense activity defined in Contract Management. If the activity is empty, maestro* uses the one from the call.
|
|
GROUP
|
Expense group linked to material entered in options Return From a Service Call.
|
|
EQUIPCODE
|
Equipment code.
|
|
EQUIPMENTTYPE
|
Equipment type.
|
|
RATETYPE
|
Letter corresponding to the rate type M for the rate of the equipment.
|
Duplicate a contract
This functionality allows the user to copy the information from one contract to another.
- Select a contract that will serve as the source on the screen.
- Manually replace the contract number with the desired number (if contract numbers are assigned manually) or delete the contract number (if maestro* assigns contract numbers).
- Click on Save to save the new contract. Answer Yes to the question Do you really want to create the new contract XXXX using the values of the contract YYYY?
In this case, all of the values from the various tabs are copied to the new contract except for documents linked to the contract, entered in the Documents icon or in the equipment tab (Documents Linked to This Contract) which are not copied to the new contract.
Last modification: September 20, 2024